
Matt's Weekly Shop Update
Kitchen Island, Barn Power – March 2024 Update
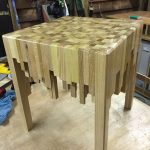
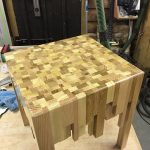
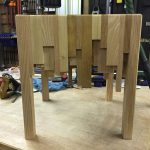
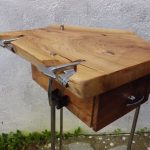
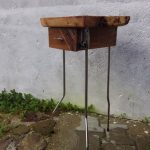
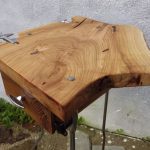
Welcome to my shop! This is a quick update to let you know what I’ve been up to. This big chunky thing is the leg
This week I finally got started on the trim for the room where I installed the hardwood flooring.
Shirts, Hats, and Stickers: https://www.mattcremona.com/shop
Thanks to Dane @ DF Designs for the awesome job on the hats and shirts: https://www.facebook.com/DF-Designs-117809398259413/
The Woodworking Shows
I had a great time at the St Paul show. I will also be attending the show in Atlanta April 1-3 with a bunch of other content creators. More details: http://www.videowoodworkers.com
MPLS Make: http://mplsmake.com/
Made out of Idigbo, European oak, English oak, American Ash leftovers.
YouTube Video: https://youtu.be/uvWxIuf-V3s
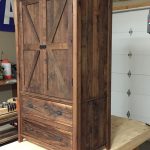
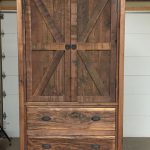
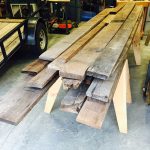
I just finished a “rustic walnut wardrobe”; one piece of the furniture I’m building for our log cabin. I’m trying to build everything from reclaimed, or very old lumber. The walnut for thispiece came from a lot purchase of about 300BF of 60+ yr old air dried walnut. Naturally, this wood is in VERY rough shape, but my self-induced challenge for all of the pieces I’m building is to make the best piece I can from only the lumber I can source…..no big box or otherwise commercially sourced, finished lumber. This piece consumed all of the usable wood I could get from the 300 BF.
The intent of this wardrobe was to retain as much rough face, saw marks, worm holes, etc… along with whatever minimum amount of jointing it takes to get the lumber usable. Determining what pieces will come from which boards is the biggest challenge. Considering the poor shape of a lot of the lumber, the whole project was an extreme exercise in planning the construction, then re-planning midstream because the wood wouldn’t cooperate.
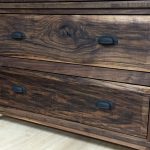
Having just watched your recent update, coincidentally, the consideration you talked about in selecting the walnut for your drawer was very similar to mine. You may appreciate the pieces i selected for the drawer fronts on this wardrobe, especially the one with the knot in it. Both drawer fronts came from the same wide walnut board, however. As an example of how bad the lumber was, this oard was 10′ long and all I could get out of it was the (2) 3′ blanks for the drawers, and even then they required some “repair” work to make them usable. The raised panel fronts are made on the table saw with an intentionally beat-up blade that will leave the circular saw marks you can find on most “barnwood”.
The finish is one coat of Waterlox Satin. I use one coat to keep from building up any kind of sheen that will appear shiny or glare. I only want to pop the grain while somewhat protecting the wood, but not build up any thickness.
Next piece will be a walnut bed that will match the theme of this piece.
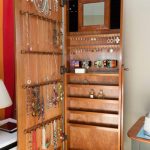
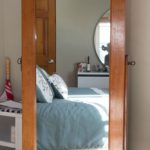
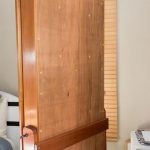
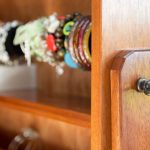
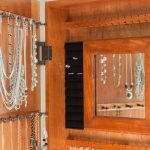
My wife originally asked for a Full-length mirror, but I also wanted to build her a jewelry box, so I decided to combine the two. Finished the project the week of Christmas. It wasn’t a surprise, but she is grateful nonetheless.
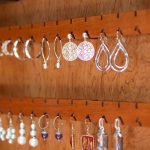
It’s an original design with cues from a few products I found surfing the web. The 1/8”-thick earring rack is something I came up with because a few of my wife’s earrings won’t fit over a common rack’s top slot and I thought it was an inconvenience to remove the backing just to mount it through a whole, so the apostrophe shape seemed like the best remedy.
The ring storage is 1/8”-thick, dovetailed mahogany box (11-7/8”L x 3-3/4”W x 1-1/8”D) with 1/8”thick plywood bottom. It is stained with General Finishes Black Gel Stain and finished with three coats of Zinsser SealCoat. The foam ring-holding insert is folded over and glued then covered with Rockler’s adhesive velvet sheets. It is affixed to the case back with brass screws.
The bracelet holders were purchased from Amazon. I cut of the base and shortened the stem. A 1-5/8” stainless steel screw affixes it to the case back.
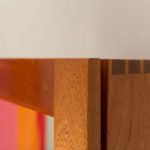
The case is made from 13/16”-thick mahogany and measures 65”H x 21”W x 4-1/2”T. The corners are dovetailed (in the wrong direction…’live and learn’) and the 1/2” mahogany plywood back-panel is screwed into its rabbeted back. The inner mirror (12” x 12”) has mitered corners and is also made from mahogany. The purpose of it is so my wife doesn’t have to close the door each time when selecting a necklace or earrings. It has proved to be a good idea. The shelves are all glued into stopped dados and the center shelf provides structural strength to hold the case sides in place. The space at the bottom is purposely left open. I will add a feature there in the future once the need arrises. It could be tilt-out bins (think potato bins), drawers or something else.
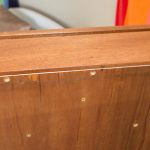
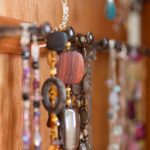
The mahogany door is mortice and tenoned using Freud 99-761 Ogee Rail & Stile Bits and 54-760 Glass Panel Door Cutter. I used these bits to create 2” tenon and chopped the mortice by hand. The mirrors are 1/4” thick and very heavy so I though a 2”+ tenon was warranted. The door attaches to the case using Rockler’s 15in-lb torsion hinges. I bought a heavier set first but they were extremely stiff. I can’t see ever needing more than 15in-lbs for most woodworking projects. The 45 necklace holders are 1-3/4” Shaker Pegs from Lee Valley. They finished with General Finishes Java Gel Stain and three coats of Deft Satin spray Lacquer. Their tenons are glued into mortices on mahogany strips (18”L x 1”W x 1/”T). The six strip affix to the frame to hold the 1/4” mahogany plywood mirror backer in place with brass screws.
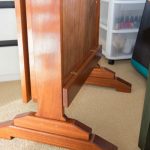
The legs are also made from mahogany but they were from a different tree and much lighter than the feet and case (also true of the mirror and earring holders). They were stained with General Finishes CandleLite Gel Stain. The legs have double draw-bore (white oak dowels) tenons into the feet. The legs attach to the case using Lee Valley’s Chavel Bolts.
All the corners where eased using a plane and sanded to 180 grit. The project was finished with three coats of SealCoat shellac and three applications of Minwax pastewax using 0000 steel wool.
This project was a pleasure to work on and gives an extra sense of accomplishment knowing it was my design. This is my first large project without outside plans. I hope it inspires others to venture outside the box and develop your design skill.
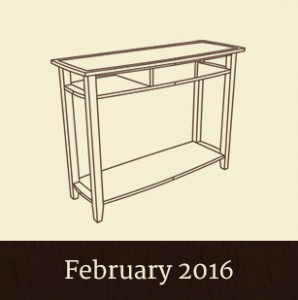
Purchase the Early Bird Bundle to get the sofa table and 2 other upcoming projects for 50% off: http://bit.ly/1m7Ytaw
Wood Talk Episode 298: http://www.woodtalkshow.com/episodes/wt298/
Toth Calendar: http://woodbytoth.bigcartel.com/product/toth-calendar-2016
Welcome to my shop! This is a quick update to let you know what I’ve been up to. This big chunky thing is the leg

Welcome back to the home renovation. This time I’m going to be working on the kitchen island. Here is a small model of the island.

Welcome back to our home renovation. Today I am going to be working on this wall. It needs some upper cabinets and the surround for